-

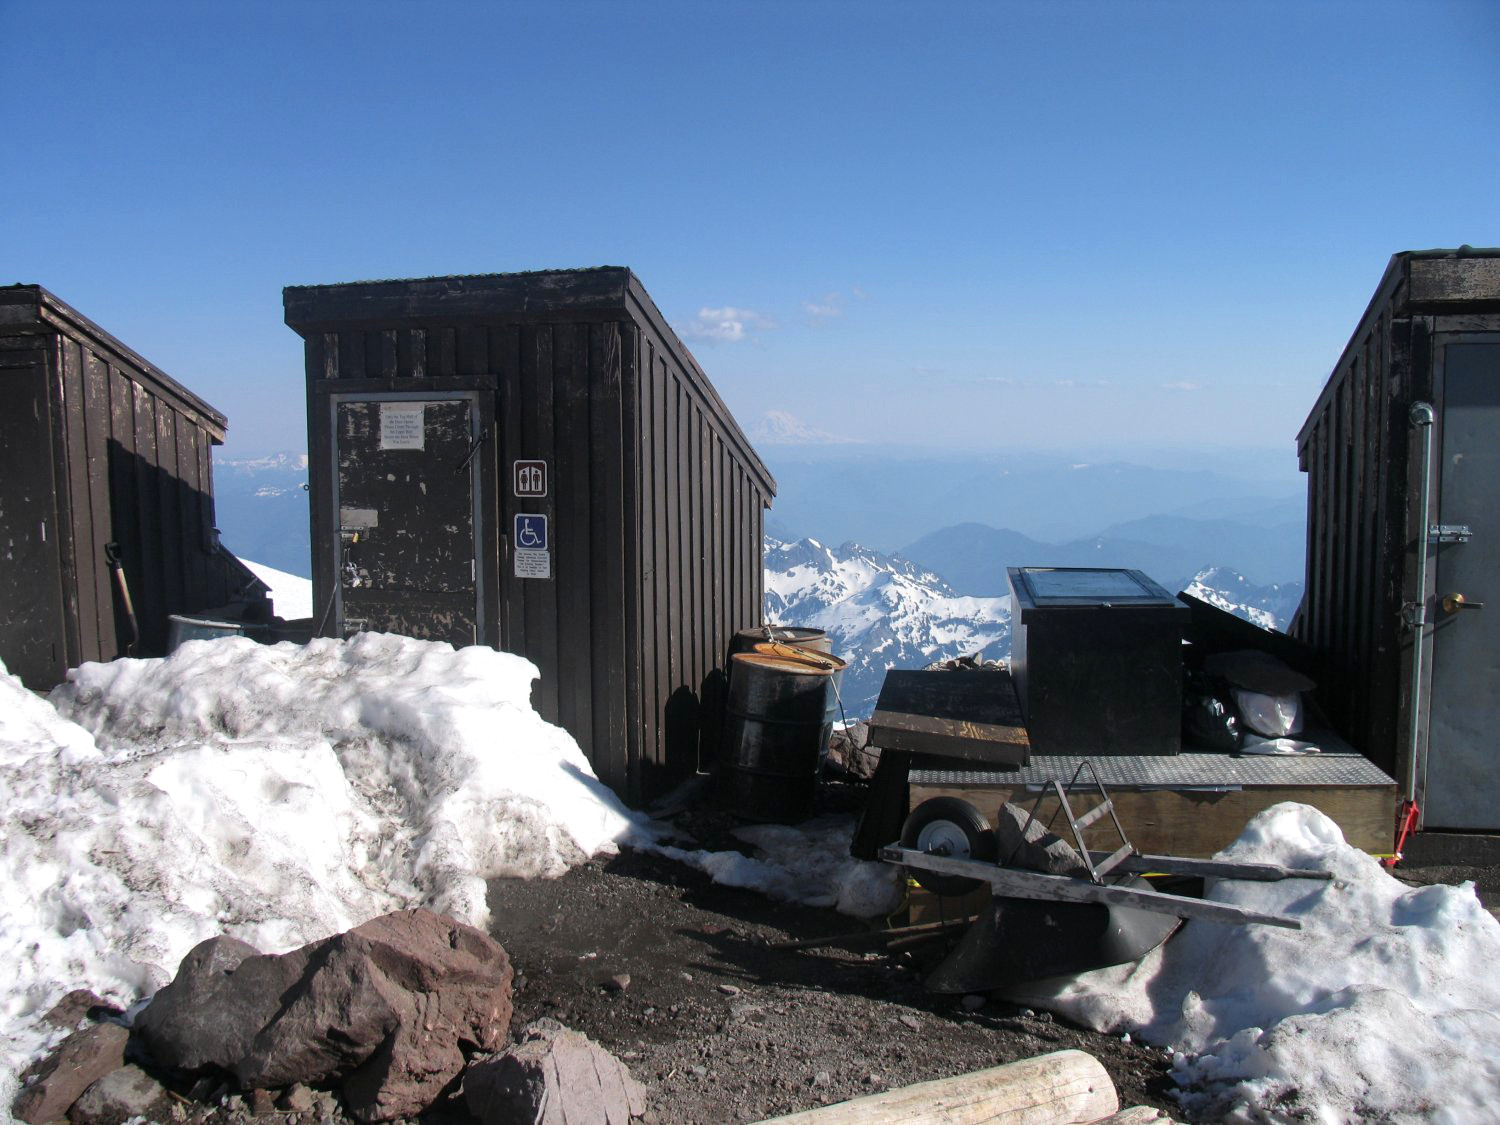
- Solar composting toilet at Camp Muir
-

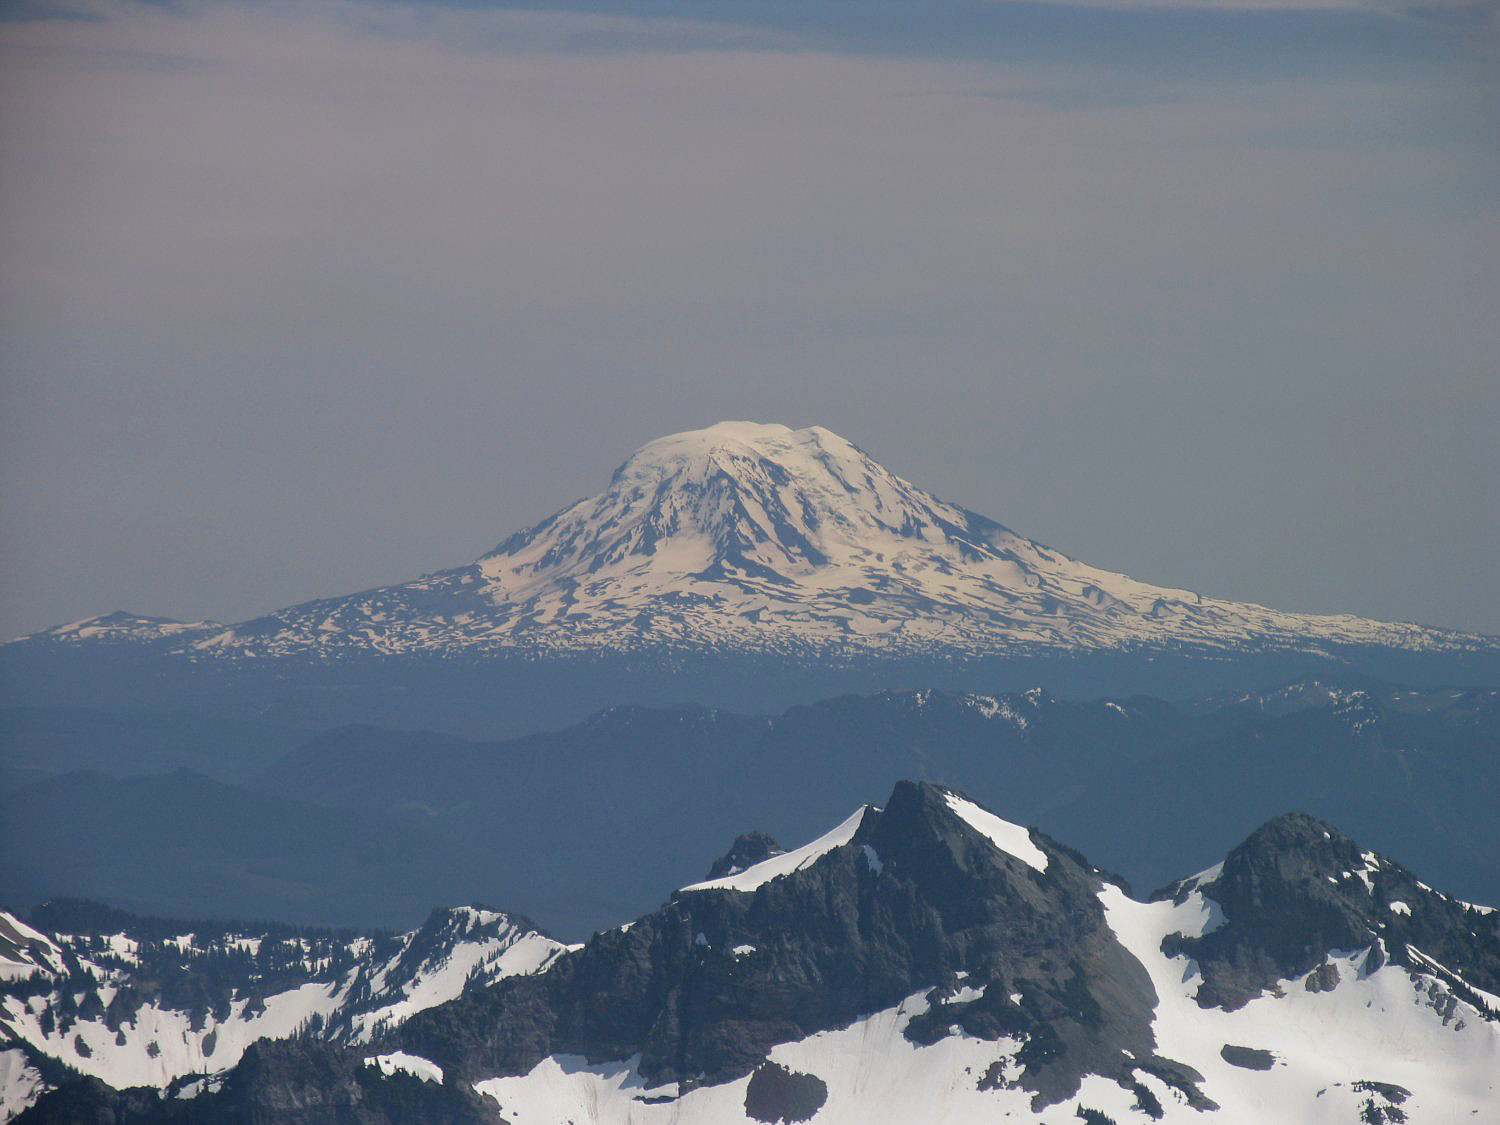
- Mt. Adams as seen from the slopes of Mt. Rainier
Introduction
We stayed one night at Camp Muir, then crossed the Cowlitz Glacier to Cathedral Gap (10,640 ft) and continued along the rock and scree ridge to Ingraham Glacier and Ingraham Flats at 11,100 ft. We spent the rest of the day here, caught some Z’s until just past midnight – then left for the summit, reached the top and returned to Ingraham Flats. At this point due to exhaustion we caught some more Z’s and then packed up the tent and hiked all the way back to Muir Camp and then Paradise and were sleeping in a bed in Seattle by night fall.
Some people hike into Camp Muir early in the morning, spend the rest of the day at Camp Muir and then try for the summit late that night. I do not recommend this type of climb – its just not worth it as its a lot of moving up the mountain very fast without giving your body enough time to acclimate or rest. Many climbers stay at Camp Muir and skip camping at the higher camp of Ingraham Flats. Camp Muir might be a bit safer – its certainly lower than Ingraham – thus a longer summit attempt. Our party consisted of three climbers.
During the summer months Rainier Mountaineering keeps the route to the summit via Disappointment Cleaver fairly well marked with bamboo wands. In addition due to the amount of traffic to the summit via this route, there is a fairly well marked trail in the snow all the way to the summit crater and then across the crater to the actual true summit. In addition, above Ingraham Flats, Rainier Mountaineering has fixed ropes and belays in the snow and ice with their ice pickets. This is the steepest section of the entire climb and in the early morning when it can be very icy – having fixed belays is extremely helpful.
Ranger Station to Camp Muir
Snow gulley at Camp Muir
Our climb was held during the last weekend in June. We had warm days and clear nights for the entire time on the mountain. We started the climb immediately from the Jackson Visitor center on top of snow covering a paved trail (this was a normal snowfall year). The start of the first days hike is through alpine forest which doesn’t last long. Soon you are on the open slopes of the Muir Snowfield and on a sunny day the suns glare can be excruciatingly warm. The average time to get from the Jackson Visitor center to Muir Camp is about 6 hours – we did it in 5, but we talked to people who took 7 hours to make this trek. Consider that the fastest recorded time to the summit from Paradise *and* back to Paradise is 5 hours and 6 minutes!
On a clear day after about 30 minutes to an hour of hiking you will see excellent views of Mt. Adams and Mt. St. Helens. At almost 12,300 feet, one can see views of Mount Adams to the south east. Mt. Adams is a good climb in its own right – some people ski off its summit – descending nearly 7000 feet! As you climb the slopes of the Muir Snowfield, Mt. St. Helens is to the south and west of Mt. Adams. Its not nearly as spectacular and if there is haze in the air will be much harder to see.
Arguably this day can be considered one of the toughest days on Rainier due to the distance and elevation. Its almost 5 miles from Paradise (where the visitor center is located) to Camp Muir – and one has to climb up over 4700 feet to reach Camp Muir – all the while carrying a heavy backup on this, your first day of climbing. I recommend starting out early this day – before 9am and taking your time during the climb. Stop occasionally and drink lots of fluid and eat snacks. There are a lot of fairly steep snowy slopes on the way up to Muir which makes hiking up slow going. We never even entertained the thought of using crampons on this days hike as the snow was very slushy and the hills were just not steep enough to warrant their use.
We had a well marked trail due to all the climbers and it was well worn in on the snow covered slopes. There were several areas of rock and earth poking out of the snow covered slopes, but not too many. Sometimes later in the season some crevasses can open up just below Camp Muir – so use extra caution when hiking in this area.
Camp Muir sits between 10,088 and 10,200 feet, depending on which guidebook you read. I guess that’s so you can choose to give a higher elevation so it sounds more impressive when you tell people! In any case, this is a high class base camp compared to many other mountain base camps. Features a ranger bunk house, a public shelter, guide house, client house as well as a nice but smelly solar powered composting toilet. It can be extremely windy here and its best to camp behind the Muir Ridge down in and among the snow gullies. The public shelter can be a bit smelly here as well and its probably better to just camp on your own. Mt. Rainier has a “poop you pack it” system. Bags with a blue “bull’s-eye” are provided for your use. Only Camp Muir and Paradise have poop bag disposal containers – so if you have an “occurrence” higher up on the mountain, you have to return the full bags with you to one of these disposal areas. The disposal area at Camp Muir is in the solar powered toilet. Unfortunately the poop bags are not Ziploc like you find on Mt. Shasta.
There are great views from Camp Muir – especially at sunrise and sunset. From your camp look towards the mountain and see the trail in the snow winding across the Cowlitz Glacier to Cathedral Gap (10,640 ft). You can also see a lot of rock fall in the snow near the actual gap. Due to the exhaustion and variety of ailments that set in after the long hike we slept for over 10 hours this night. The otherwise deep sleep was only interrupted several times by loud rock and ice falls in the distance. This is more common during the day when its warmer and the snow and ice is melting, but occurs at night as well.
Muir Camp is well well-protected away from the glacier, rock and ice fall.
Camp Muir to Ingraham Flats
The Cowlitz Glacier leading to Cathedral Gap
We had about 50 feet of rope between us and kept the slack to a minimum. This part of the trail leading to Cathedral Gap is a fairly gentle climb – certainly a lot less steep than most of the slopes we had climbed up the prior day.
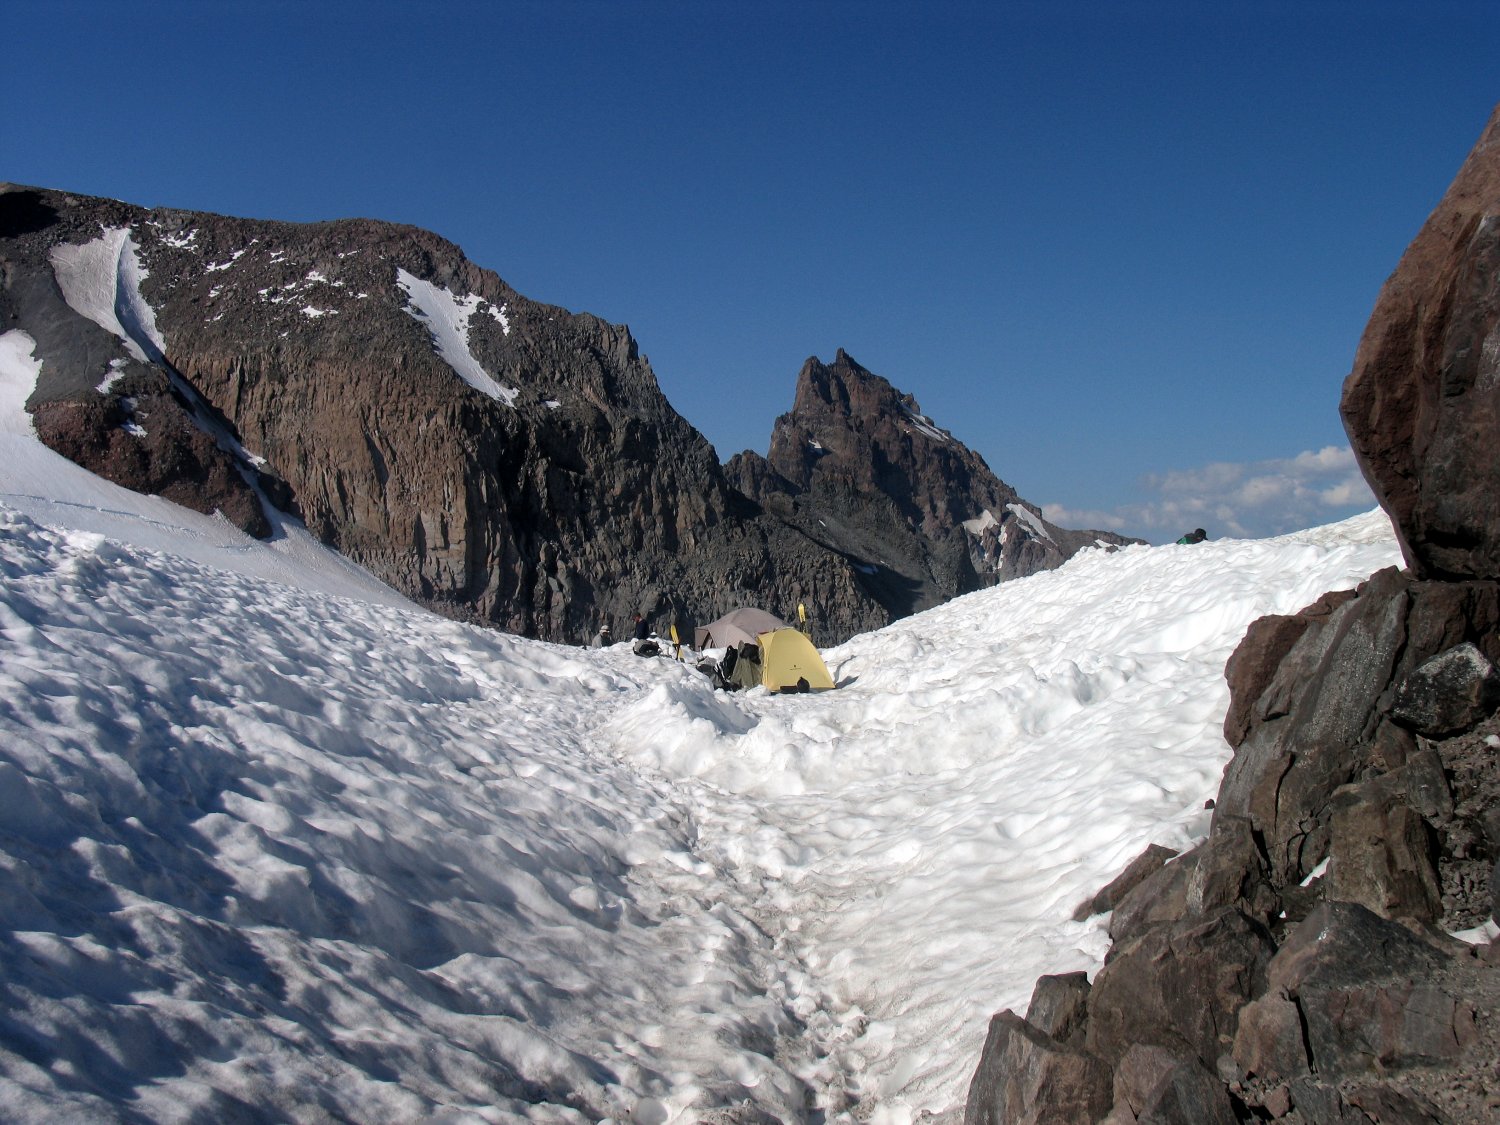
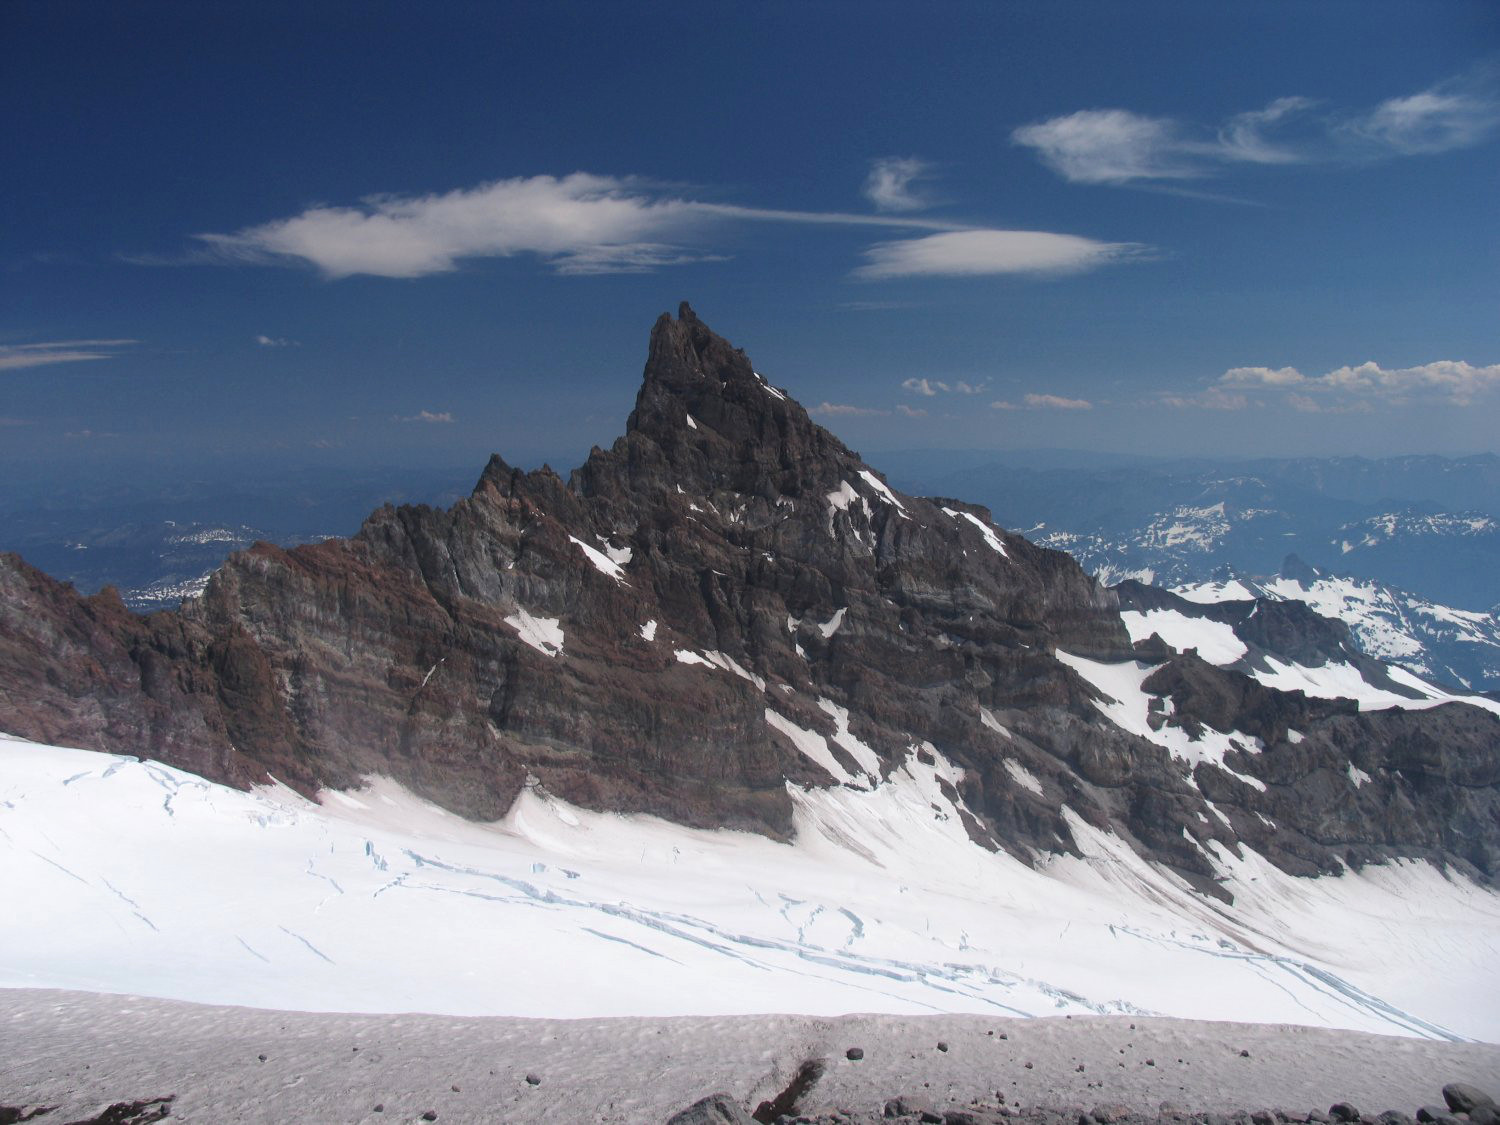
Once you approach Cathedral Gap gather up your energy for a fast climb through this area. There are generally lots of rocks scattered about on and near the trail for several hundred feet and you do not want to stop here. By late June the snow will have generally melted off of much of this Gap and ridge. Once you leave the snow you will switch back several times up a very steep rocky slope until you finally reach the top of the slope. This is a good rest area if its not too windy – climbers will have excellent views of the Tahoma Spire and Ingraham Flats, this route’s high camp.
You will climb up the ridge for a short ways eventually stepping onto the edge of Ingraham Glacier. Be careful in this area especially without crampons as the section between the glacier and the scree/dirt is deceivingly slippery. You cross a several hundred long steep snowy slope just below a bergshrund and just above ice seracs and crevasses from the glacier. Soon you are at Ingraham flats (often mistakenly called Ingram Flats by climbers). The main trail does not lead to each of the campsites; you have to leave the trail and cross several hundred feet to where the camp sites are located. The sites sit right on top of and in the middle of the glacier – walk with caution to avoid any crevasses that might be buried beneath the snow.
By this time of year there are usually pre-existing camping sites dug out into the glacier with snow walls surrounding them, offering wind protection. Before you actually setup your tent, poke your ice axe0 into the snow to make sure there are not any buried crevasses close to the surface.
We arrived here around 12pm – setup camp and spent the rest of the day relaxing and admiring the spectacular view. We often heard rock falls coming from the closest steep slope to us as well as other louder ice falls coming from on top of and deep within the glaciers. Orient your tent so your entrance looks out at the jagged looking Tahoma Spire to the south west. Behind Ingraham Flats higher up the mountain is the jagged looking Ingraham Glacier full of huge sharp ice seracs. You can also see the part of the route, especially the part that switch backs its way up Disappointment Cleaver.
There are no blue bag disposal cans at Ingraham Flats – so you have to pack these down to Camp Muir on your return climb.
Ingraham Flats to Summit
We were in bed by about 7:30 pm after having carbo loaded for the upcoming early alpine start. We set the alarm for 12:30am but did not actually start climbing until 1:30am. It took about an hour to get everything in order even though we had packed our summit packs the night before.
To start the climb this morning for the upper body I had four layers of fleece on, and a down 700 fill jacket. For the lower half I had a thick pair of fleece pants and a Gortex shell. Then on top of all these layers I wore an 8000 meter thick down suit with thick hood. I also had a baclava on my head under my climbing helmet. In addition, I wore battery powered electronic warmers with special insoles in my climbing boots. If your feet get cold easily, I cannot say enough about how great the Hotronic feet warmers are ( www.hotronic.com – note that many of the stores Hotronic lists on their website who say they carry Hotronic’s products either don’t carry the products or only carry them seasonally – a company that always has Hotronic products in stock is: www.cozywinters.com ). It was so cold and windy, if I did not have these foot warmers I would have been in a world of hurt.
-

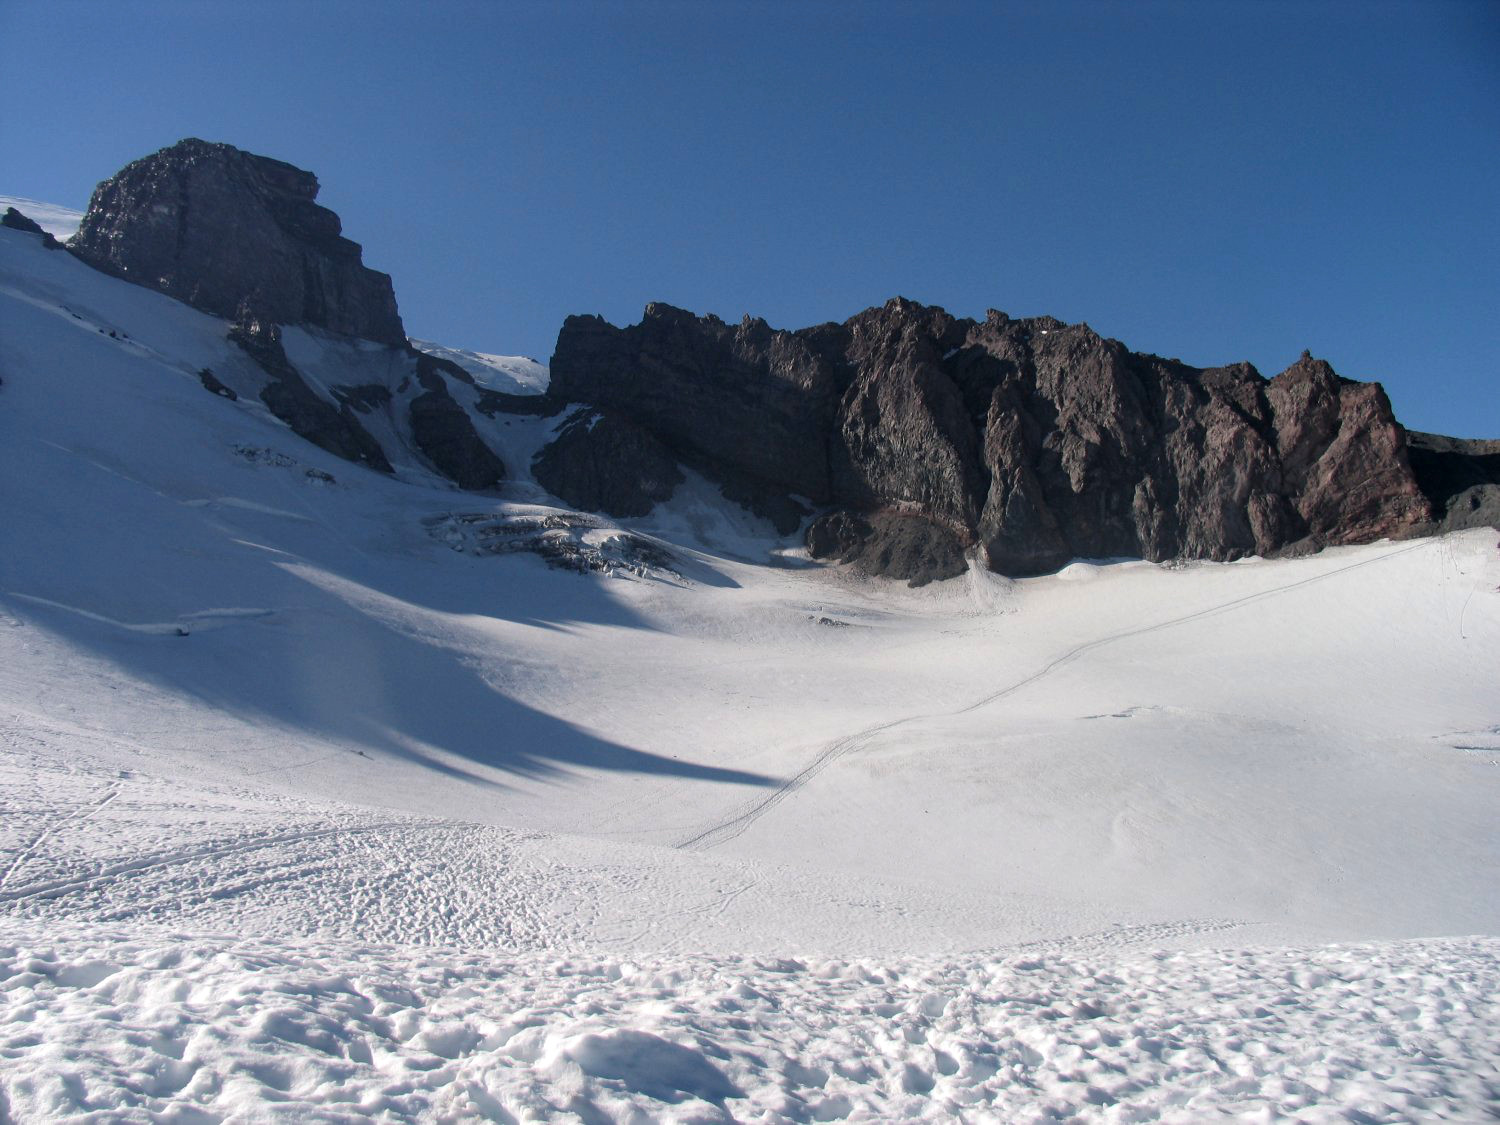
- Tahoma Spire as seen from Ingraham Flats
-

- Ice Seracs next to the camp
Now you might think this amount of clothing is crazy, but I get cold extremely easy and for the most part all these layers kept me pretty warm. For most people the down suit would be overkill. I could not stop in the wind for too long or I would start to get cold, so the breaks we took on the way to the top were fairly short. During the strenuous part of climbing the steep slopes I would start sweating a bit and would have to unzip the leggings of the down suit and also the upper part. This meant I had to drink more than the others. During the descent in the hot sunshine I was extremely hot (see the part about the descent below).
An early alpine start is very important as it is colder at night than during the day which helps limit the amount of rock and ice fall. Many of the guided climbers from Camp Muir may start their summit day as early as midnight and if its warm even earlier than that like 10 or 11pm. Since Ingraham Flats is about an hour to 90 minutes closer to the summit, you can leave accordingly.
The trail winds behind the camp – gently climbing over the glacier and near unstable leaning ice seracs as you get closer to the steeper part of the glacier directly behind Ingraham Flats. You need to move extremely fast through this section as the ice seracs are very unstable. In fact, the worst climbing accident on US soil occurred in this area on June 21, 1981 when 11 climbers were killed after a huge ice serac fell on them (read on further for our own experience with falling ice seracs on our return climb down the mountain).
After about 30 minutes and 300 feet in elevation gain, you will start climbing up to the cleaver via a very dangerous area of unstable crumbling rocks and in an area with a high potential for ice fall. You absolutely need to move fast through this section.
Once you climb through the very rocky/icy area you will begin the steepest portion of the entire climb via this route. Slopes up to 50% grade are present – in this area RMI will most likely have fixed belays, with ropes anchored to snow pickets. In the early morning this area can be very icy – most of the steep trail is more of a narrow snow chute in which it is difficult to climb out of. This is not a good section to pass other climbers. Its a good idea to clip into the anchored rope which you will have to clip and unclip several times as there are a number of fixed ropes setup.
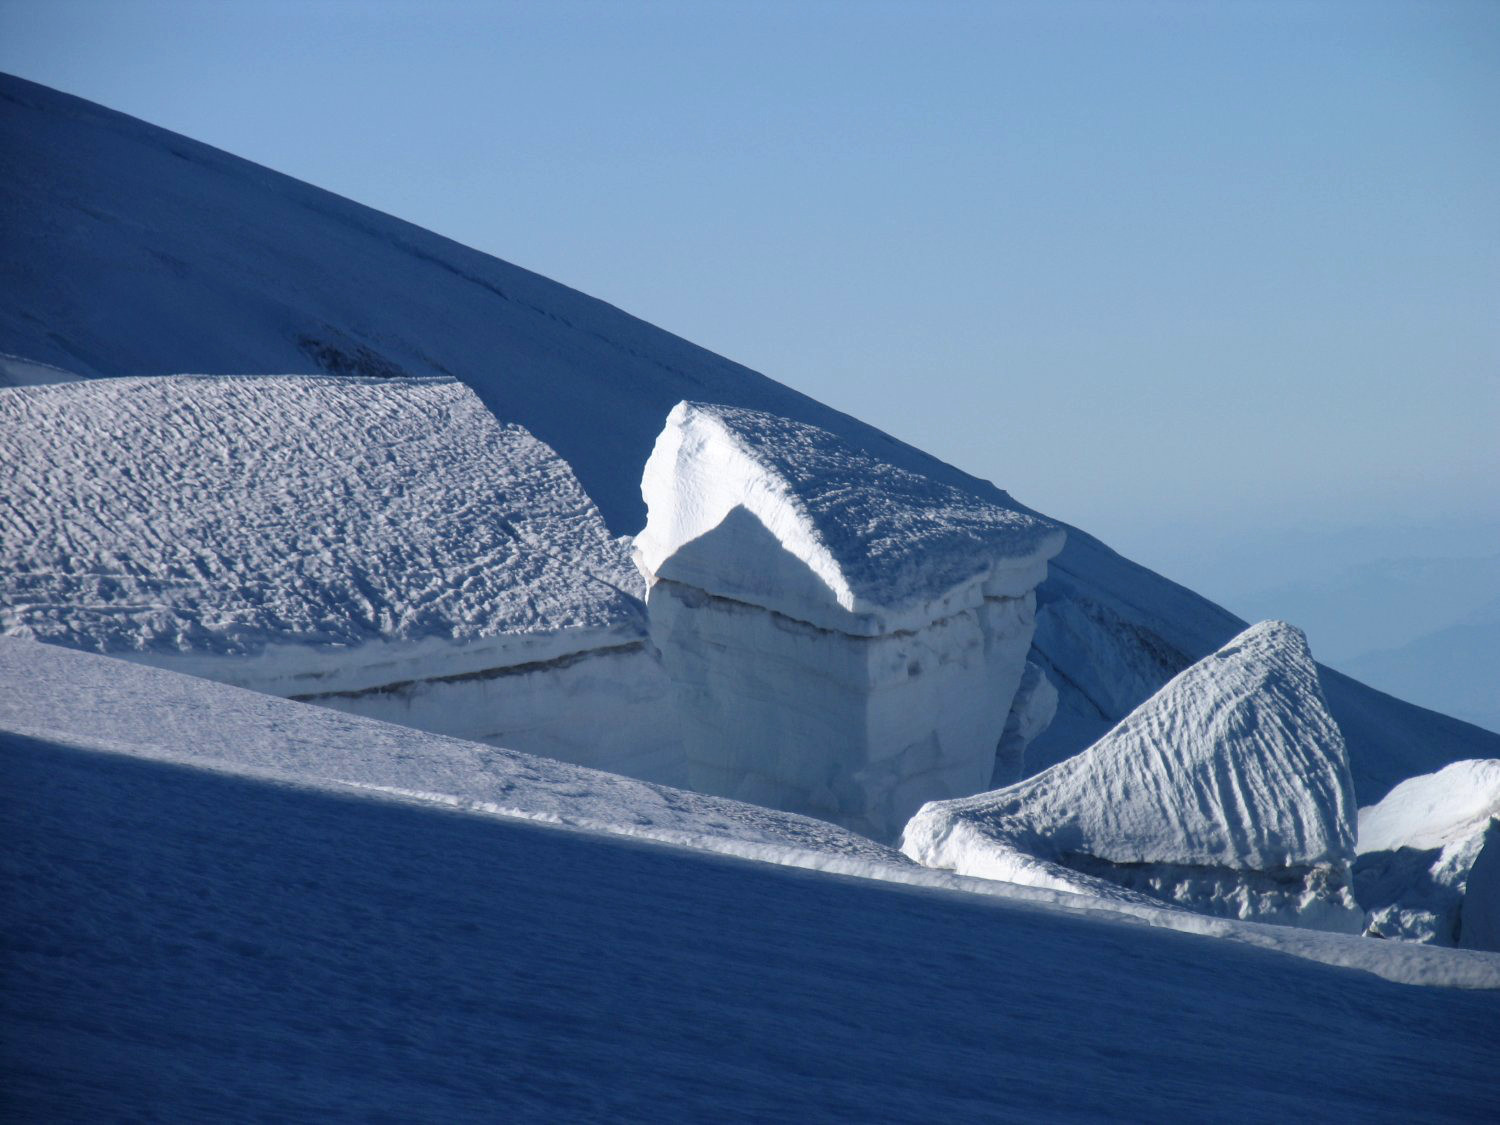
If this section is windy you won’t be able to hear your climbing partners – and you are pretty much on your own. Its almost guaranteed that with an early alpine start it will be quite cold. Once you get past the real steep section (normally 45 mins to an hour) you will soon arrive at a rather small flat area which is a good place to take a rest break. This is at about 12,300 feet. From here, you climb below some very dangerous looking seracs (don’t want to take any rest breaks here) and from these seracs its pretty much a slog on Ingraham Glacier on switch backs all the way up to the summit crater. These switch backs are not nearly as steep as the ones that you climbed up the cleaver however they are quite steep and its uphill the entire way. Be cautious as there are crevasses along the trail and you have to be careful where you step. Just because there is a trail, does not mean its safe. You will most likely come across several snow bridges and you and your climbing partners should use extreme caution until all group members are across.
Snow bridges can be deceiving. They can be extremely strong when frozen, but when the sun warms them they lose their strength very fast and can drop you into the crevasse where earlier they would have held just fine. We walked across several bridges in which you could look straight down and see the steely blue green of the guts of the glacier. The snow bridges we walked across appeared to be no more than 8-12 feet across at the longest points – there were several other even shorter bridges. Several factors which determine the strength of a snow bridge are time of year, time of the day, length of the bridge and thickness.
One of the greatest experiences on Rainier is to see the sunrise from high up on the slopes. Right when the sun peaks above the mountains far below you are cast in an other-worldly pink light. Thss time of year one can actually start to see the sky lighten in the 4am hour – and its this first light which can be an inspiration to climbers when its so cold and dark.
-

- Mt. Rainier WA
-

- Summit crater from south ridge

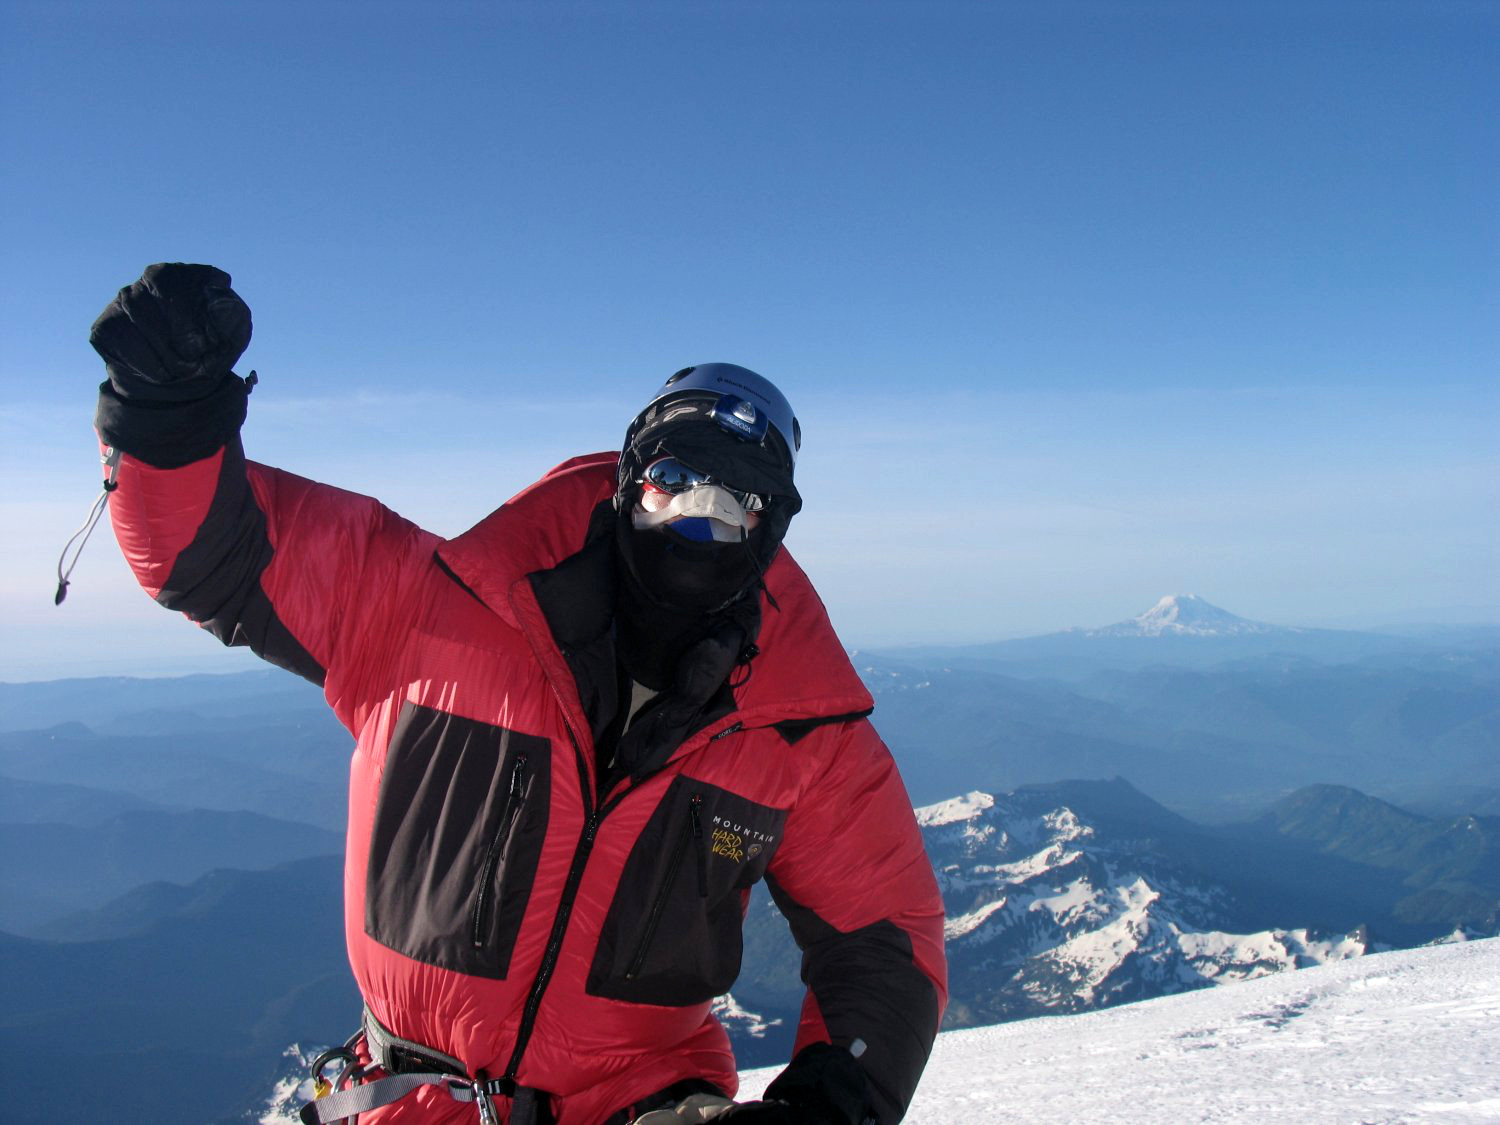
We reached the summit crater (14,150 feet) around 7am – and because it was so windy and cold spent only about 15 minutes actually enjoying the view from here. In fact our exposed water bottles were frozen through pretty well by this time and only in the inner part of the bottle was there still unfrozen water.
We saw one party had setup a tent in the middle of the summit crater near the trail. From here hiking on the trail to the other side of the summit crater to the true summit (called Columbia Crest, the highest point on the crater rim) and summit register will take about 20-30 minutes. You actually descend into the crater, walk across it gradually uphill and slowly ascend the slightly steeper other side. Its not a hard hike as there isn’t a lot of elevation gain (only about 260 feet) other than the fact you are above 14,000 feet and have expended so much energy getting to this point. There are great views of Mt. Adams from all over the crater rim. you can also see Mt. St Helens and if there is no haze, the pointed spire of Mt. Hood in Oregon is visible way to the south.
The Descent
Now for the downhill! Going down is much quicker of course, but you have to be extremely cautious as the weather is probably warming up which increase the probability for rock, ice and serac fall (the snow was already slushy when we started down in the early morning).
On the open steep slopes of the upper Ingraham Glacier below the summit crater we encountered many climbing parties – most probably started up from Camp Muir. One of the guides remarked to me how I was the first person he’s ever seen on Rainier wearing a 8000 meter down suit! On these upper slopes it is fairly easy to step off the main trail to let others pass you. The sun was shining brightly and by the time we reached the top of the cleaver below the seracs at the flat rest area, I was burning up. I was sweating so much I had to remove the down jacket and jettison the down hood.
Descending the steep section was much easier than when we previously ascended in the 2am darkness and on the slippery ice. Now the snow was extremely slushy and while very steep, the snow would cushion your downhill steps and descending was actually rather easy on the steepest parts of the cleaver.
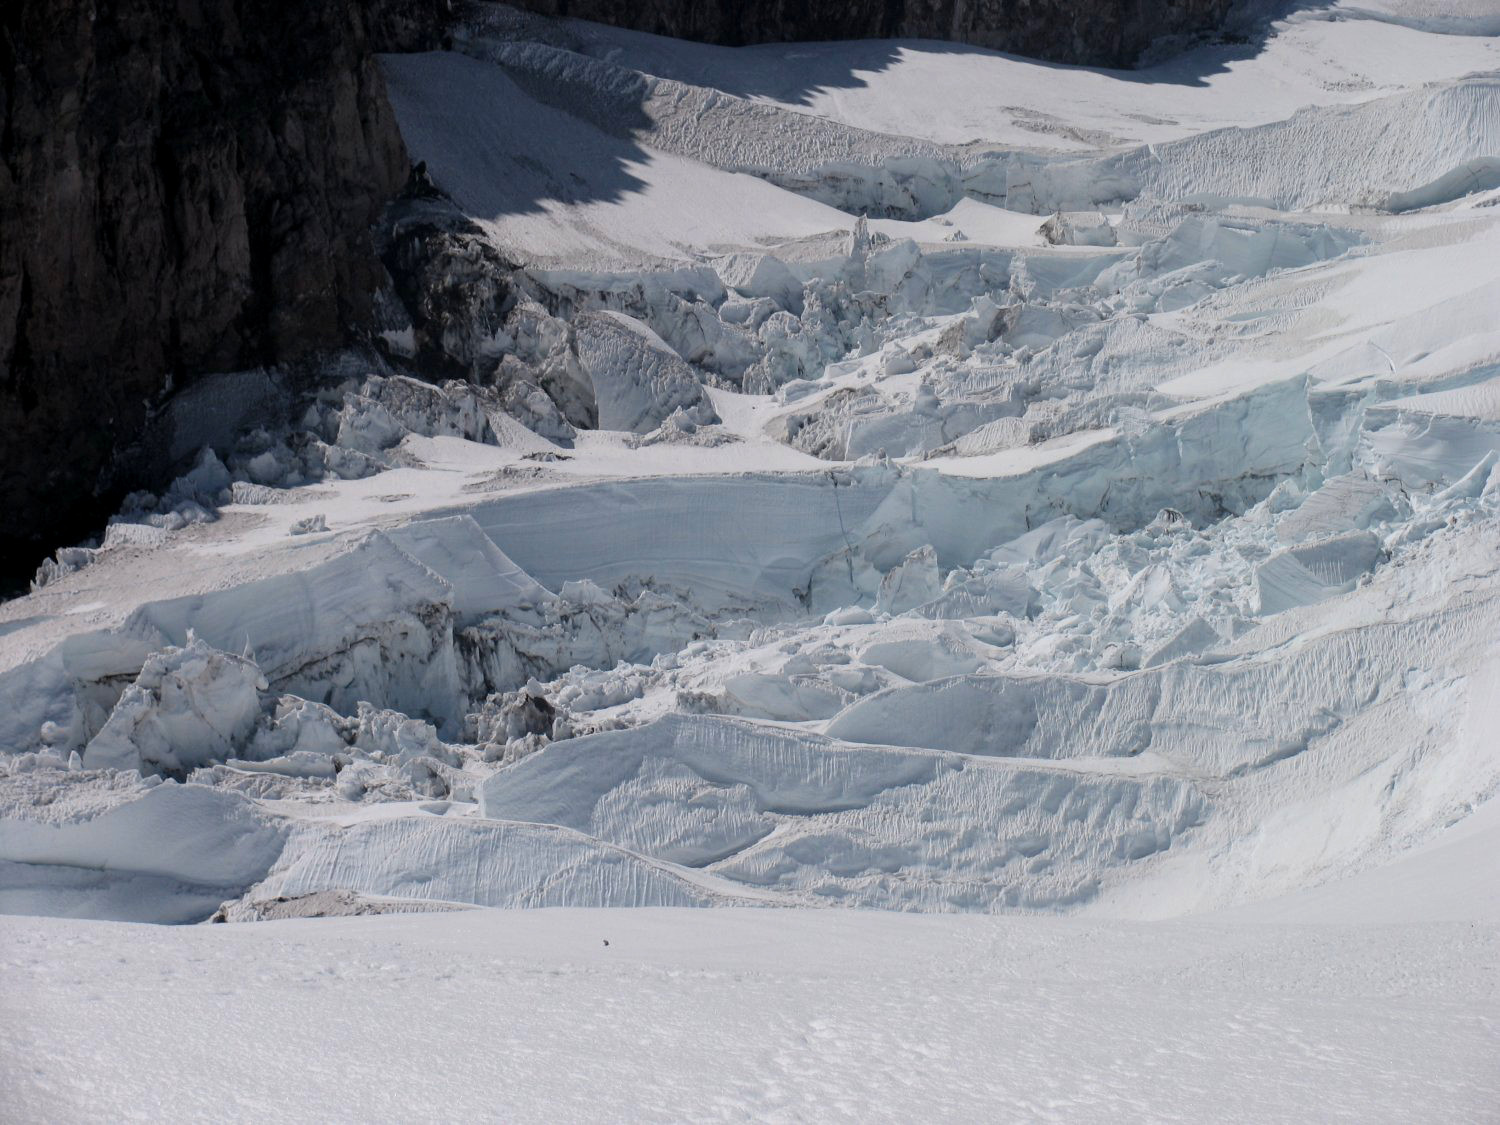
Serac & crevasse littered Ingraham Glacier
Upon returning to our camp at Ingraham Flats we promptly ripped off all our warm clothes, held our noses due to the incredible stench, of our bodies and sank into the warm tent and ripped some Z’s for 2 hours. Upon finding energy after our sleep, we broke camp and headed down the mountain.
We stayed roped up across the Bergshrund and down to Camp Muir but took off our crampons Ingraham Flats because the snow was so slushy and we were going to be descending mostly on scree and rock. Leaving Ingraham Glacier and stepping onto the rock ridge was a slippery section as parts of the glacier extends underneath the rock and earth. We motored through Cathedral Gap near all the rock fall and continued across Cowlitz Glacier to Camp Muir.
Returning from Camp Muir to Paradise is one big slog in the snow. At least going down is much faster than going up and the snow is much more forgiving than hard ground, especially with a heavy pack on your back. Once you hit the bare ground its a major shock to your legs as previously one has been used to the forgiving snow on the descent.
Glissading opportunities are very rare on Rainier compared to other Cascade mountains such as Mt. Shasta. The slopes typically are not steep enough for glissading and the slopes that are steep enough are typically found on the glaciers. Its not a wise idea to glissade on glaciers due to possible hidden crevasses. A note of caution when descending rapidly – look for areas where the snow has sunken in near where the snow meets the edge of a slope or rock pile. Use extra caution around these areas as you don’t want to posthole all the way through the snow and get your foot caught in a rock pile – all the while you are hauling ass downhill.
Once you arrive at the visitor center you must check out and hand a ranger the stub from your climbing pass.
Other Rainier Notes
Scientists estimate Rainier has a good chance of partially exploding sometime in the next 100 years. Deep layers of dirt have been found in Seattle which are directly traced back to the slopes of this mountain. Rainier has the largest amount of ice and glaciers of any mountain in the lower 48. Scientists say that even a small eruption will send millions of tons of snow and ice and mud down into the nearby towns with the possibility of going all the way to Seattle. The catastrophic damage of this mud flow, would be unbelievable. There is a warning system setup in the nearby towns and cities but pre-warnings might be slim to none.
Rainier National Park has seen its share of plane crashes with the most famous one in 1946. A military plane carrying 32 Marines crashed into the side of Rainier killing all on board. The bodies and the wreckage remain entombed in the glacier. In 1992 a small plane supposedly crashed in the summit crater and today is now buried in the snow and ice.
Parts of the summit have hot steam vents and fumaroles emitting gases and hot water. You can actually see this gas and steam emitting from parts of the inside walls of the summit crater – b/c these gases are pretty warm you won’t see any snow covering the ground in these areas. As a result of all this heat there is a series of ice tunnels and caves underneath the snow in the summit crater. I’ve read that if you know what you are doing you can actually enter the ice tunnels at one end of the summit crater and exit on the other side! This sounds like a good option for a future Rainier trip!
If you know anything about the weather on the Mt. it changes rapidly. It can be sunny (no cloud in the sky) and cloudy the next. It is notoriously hard to predict what the weather will do up there. My friend was up there snow shoeing the same day as these people and nearly got lost.
Great article with lots of attention to detail for those inclined to make this trek. Sadly I’ve never summited Rainier but have hiked all around it every summer. You got some great shots here and memories for a lifetime, congrats.
Yes you are very correct about the weather – unpredictable is a good word for Rainier.